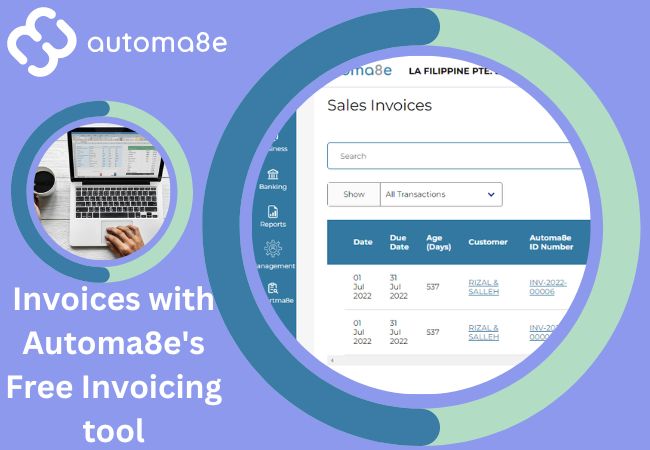
In the fast-paced world of business, efficiency is key. One area where efficiency can make a significant impact is in managing your finances. Creating professional invoices is a crucial aspect of any business, and Automa8e’s Free Invoicing Tool can help you streamline this process. In this article, we’ll guide you through the steps to create polished invoices using this user-friendly tool.
In this blog, we’ll explore:
- Why Professional Invoices Matter
- Getting Started with Automa8e
- Understanding the Invoice Form
- Adding Items to the Invoice
- Conclusion
Why Professional Invoices Matter
1. Legal Compliance
Professional invoices are legally required in many countries. They ensure that your business adheres to financial regulations, reducing the risk of legal complications.
2. Building Trust
Well-crafted invoices instill confidence in clients, portraying your business as reputable and organized. Trust is crucial in business relationships, and professional invoices help establish it.
3. Prompt Payments
Clear and professional invoices include payment terms, encouraging timely payments, and improving cash flow.
4. Brand Image
Invoices are an extension of your brand. Professional design with logos and consistent branding enhances brand recognition and sets you apart.
5. Efficient Record-Keeping
Professional invoices simplify financial management, tax preparation, and audits, ensuring accurate record-keeping.
6. Competitive Edge
Professionalism distinguishes your business in a competitive market, fostering client loyalty and referrals.
7. Dispute Resolution
Comprehensive invoices serve as valuable references, aiding in quick and amicable dispute resolution.
Getting Started with Automa8e: Your Path to Efficient Invoicing in Singapore
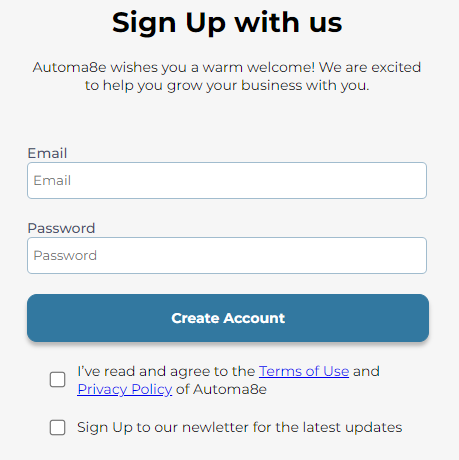
Step 1: Sign Up with Automa8e and Grow Your Business!
Automa8e extends a warm welcome to you! We’re thrilled to join you on your journey to business growth and success.
Sign Up Details
- Email: Please enter your email address.
- Password: Create a secure password for your account.
- Create an Account: Click this button to start your journey with us.
By clicking “Create Account,” you indicate that you have read and agree to Automa8e’s Terms of Use and Privacy Policy. We’re committed to safeguarding your information and providing you with exceptional invoicing experience.
Step 2: Logging into Your Automa8e Account
After successfully signing up for Automa8e, the next step is to log in to your account. Logging in allows you to access all the features and tools Automa8e offers. Here’s a step-by-step guide on how to do it:
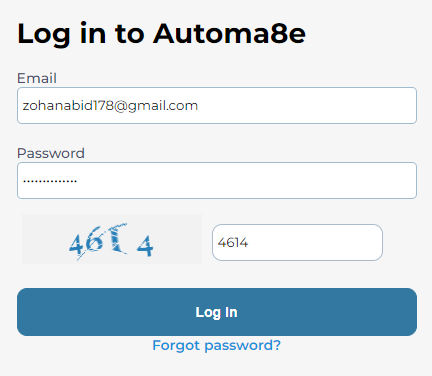
1. Email:
- In the “Email” field, enter the email address you used during the sign-up process. This should be the email address associated with your Automa8e account.
2. Password:
- In the “Password” field, enter the secure password you created during sign-up.
3. Captcha:
- To ensure the security of your account, Automa8e may require you to enter a captcha code. In the “Captcha” field, input the code provided. This step helps prevent automated or unauthorized access to your account.
4. Log In:
- Once you’ve entered your email, password, and captcha code, click the “Log In” button to access your Automa8e account.
Forgotten Password?
- If you’ve forgotten your password, there is typically an option provided to reset it. Look for a “Forgot Password?” or similar link, which will guide you through the password recovery process.
Please note that it’s essential to keep your login credentials secure and confidential to protect your account and data. Once you’ve successfully logged in, you can start using Automa8e to create invoices, manage clients, and streamline your business finances.
Step 3: Complete Your Business Profile
To fully harness the power of Automa8e and streamline your invoicing process, it’s essential to provide accurate and comprehensive information in your business profile. Follow these steps to complete your profile:
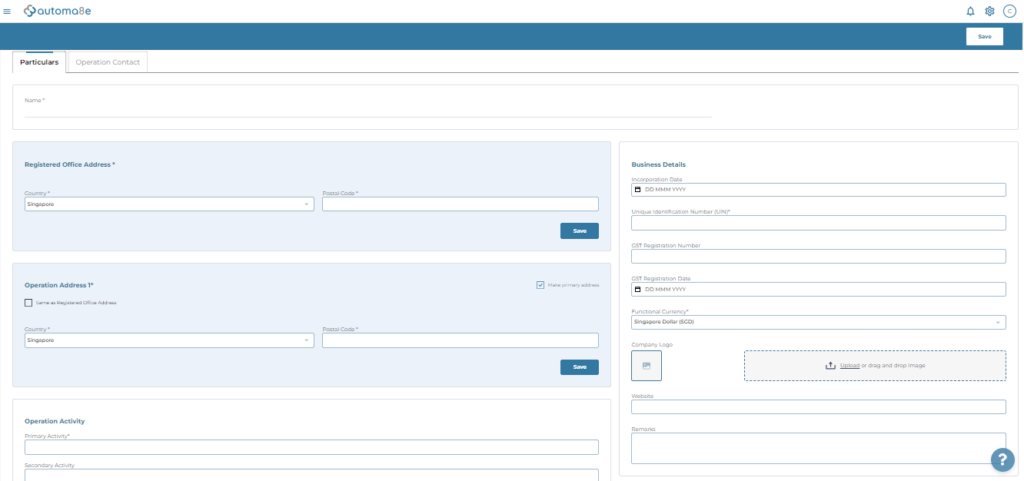
Particulars
Name *
- Enter the official name of your business or company.
Registered Office Address *
- Input the registered office address of your business. This is the address where your business is officially located.
Country *
- Select “Singapore” as your country.
Postal Code *
- Specify the postal code associated with your registered office address.
- Click “Save” to store this information.
Operation Activity
Primary Activity *
- Indicate the primary type of business activity your company is engaged in. This helps categorize your business correctly.
Secondary Activity
- If applicable, you can mention a secondary business activity here.
Business Details
Incorporation Date
- Enter the date (in DD MMM YYYY format) when your business was officially incorporated or registered.
Unique Identification Number (UIN) *
- Provide your business’s Unique Identification Number, if applicable. This could be a government-issued identification or registration number unique to your business.
GST Registration Number
- If your business is registered for Goods and Services Tax (GST), enter your GST Registration Number.
GST Registration Date
- Specify the date (in DD MMM YYYY format) when your business was registered for GST.
Functional Currency *
- Choose “Singapore Dollar (SGD)” as your functional currency, as this aligns with your business operations in Singapore.
Company Logo
- If you have a company logo, you can upload it to personalize your invoices. Your logo adds a professional touch to your documents.
Operation Contact
Name *
- Enter the name of the primary contact person for your business operations.
Email *
- Provide the email address where you want to receive important notifications and correspondence.
Mobile Number *
- Input a mobile number where you can be reached quickly.
Completing your business profile with accurate and up-to-date information ensures that your invoices are professional, legally compliant, and tailored to your specific business needs. Once your profile is complete, you’ll be ready to start creating invoices and managing your finances with Automa8e.
Step 4: Creating an Invoice in Automa8e
To generate an invoice in Automa8e, follow these instructions:
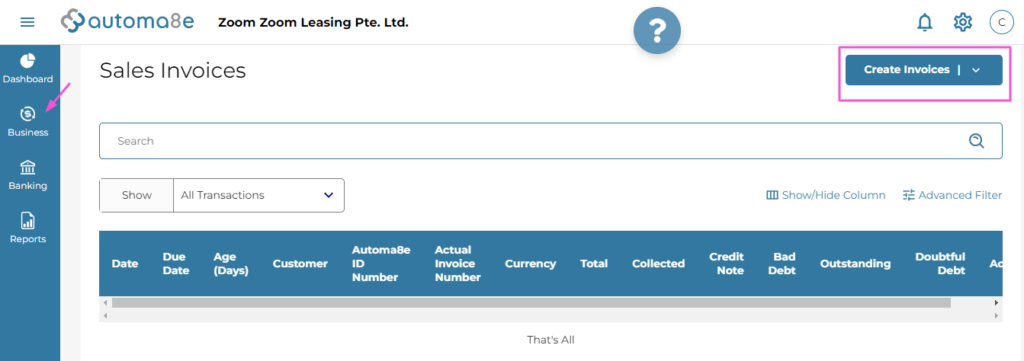
Access the Business Tab
- First, navigate to the “Business” tab in your Automa8e account. This tab is usually located in the left sidebar.
Click on “Sales”
- Within the “Business” tab, you’ll find various options related to your business operations. Look for and click on the “Sales” option.
Create an Invoice
- Once you are in the “Sales” section, you’ll typically see an option to “Create Invoice” or something similar. Click on this option to start the invoice creation process.
Understanding the Invoice Form
Before we dive into the details, let’s take a moment to understand the elements of the invoice form:
- Document Type: Select “Invoices” as the document type.
- Invoice Date: This is the date when the invoice is issued. It’s important to accurately record this date.
- Due Date: Specify the due date by which the payment should be received.
- Invoice No: The system will generate a unique invoice number automatically.
- Export Permit No (if any): If your business involves exports, you can enter the export permit number here.
- Transport Document: If applicable, you can upload the transport document, ensuring it does not exceed 2MB in size.
- Invoice Contact: Enter the contact details of the person responsible for the invoice.
- Delivery Address: Provide the delivery address relevant to the transaction.
- Currency: Choose the currency for your invoice. In this example, we’ve selected SGD (Singapore Dollar).
Adding Items to the Invoice
Now, let’s move on to the most crucial part – adding items to the invoice. Follow these steps:
- Item Description/SKU: Enter a brief description or SKU (Stock Keeping Unit) of the item or service being invoiced.
- Quantity: Specify the quantity of the item or hours of service provided.
- Rate: Enter the unit price or hourly rate for the item or service.
- Discount (%): If you’re offering any discounts, enter the percentage here.
- GST (%): If applicable, specify the Goods and Services Tax (GST) percentage.
- Total: The system will automatically calculate the subtotal, GST amount, and total for each item.
Reviewing the Invoice
Before finalizing the invoice, take a moment to review the details. Ensure that all information is accurate and complete. You can also preview the invoice before sending it to your client.
Payment Options
Once the invoice is ready, you need to specify your preferred payment option. Here are two common choices:
- Pay Now: If you wish to receive immediate online payments, provide your Unique Entity Number and payment details.
- Cheque: If you prefer receiving payments by cheque, provide the address where clients should send their cheques. Include any attention details if necessary.
Review and Confirm
- After filling in all the required information, take a moment to review the invoice for accuracy. Ensure that all details are correct and that you’ve included all billable items or services.
Save and Send
- To send the invoice immediately, click “Save and Send.” This will dispatch the invoice to the recipient’s email address.
Save as Draft
- If you’re not ready to send the invoice yet, you can choose to “Save as Draft.” This will keep the invoice saved in your account, allowing you to send it later.
Save and Next
- If you have more invoices to create or manage, you can use the “Save and Next” option. This will save the current invoice and take you to the next one in your queue.
Remember to double-check all the recipient details and the subject line to ensure accurate delivery. Sending professional and well-organized invoices contributes to a positive business relationship with your clients.
In Conclusion
In the world of business, where precision and professionalism are paramount, the significance of well-crafted invoices cannot be overstated. Automa8e’s Free Invoicing tool has emerged as a valuable ally for businesses, offering a seamless and efficient way to create professional invoices.
By utilizing Automa8e’s user-friendly interface and versatile features, businesses in the United Kingdom and beyond can simplify their invoicing process, enhance their brand image, and ensure timely payments. With Automa8e, invoicing transforms from a mundane task into a strategic move to streamline financial operations.
Invoices are more than financial documents; they are representations of your commitment to quality and professionalism. By investing in the creation of professional invoices, you’re not only ensuring legal compliance but also building trust, securing prompt payments, reinforcing your brand, maintaining efficient records, gaining a competitive edge, and facilitating dispute resolution.
So, whether you’re a small startup or an established enterprise, remember that your invoices are an integral part of your business’s success story. They are the bridge between your exceptional products or services and the recognition they deserve. Automa8e’s Free Invoicing tool is your trusted partner on this journey, making invoicing an art form that speaks volumes about your dedication to excellence.
Take the step towards professional invoicing with Automa8e, and elevate your business’s financial management to new heights. It’s not just about creating invoices; it’s about creating opportunities for growth, trust, and success.