Keeping up with invoicing can be a challenge, especially when you have to manually send each one. The time it takes to draft emails, attach invoices, and double-check everything can add unnecessary stress to your day. Mistakes can slip through, and delays in sending invoices can lead to cash flow issues. What if you could send invoices with just one click? With Automa8e accounting software, you can do just that. Our email invoicing feature streamlines the entire process, allowing you to send invoices directly from the software with a single click, saving you time and ensuring accuracy every time.
Benefits of Using Automa8e for Email Invoicing:
Using Automa8e for email invoicing offers key advantages that can enhance your business operations.
Time Savings
Automa8e streamlines the invoicing process, allowing users to send invoices with just one click. This automation reduces the time spent on manual tasks such as drafting emails and attaching invoices, enabling businesses to focus on more critical activities. By minimizing administrative burdens, companies can allocate resources more efficiently and improve overall productivity.
Improved Accuracy
E-invoicing through Automa8e significantly reduces the likelihood of human errors, such as typos and miscalculations. With standardized templates and automated data entry, the chances of missing important information are minimised. This accuracy not only enhances the reliability of financial records but also helps prevent payment disputes and delays, ensuring that invoices are processed smoothly and on time.
Better Customer Relations
Timely and accurate invoicing contributes to improved customer satisfaction. Automa8e allows businesses to send invoices promptly, which can lead to quicker payments and foster a positive relationship with clients. By maintaining professionalism through consistent and clear communication, businesses can enhance their reputation and encourage repeat business. Additionally, features such as automated reminders for upcoming due dates can help keep clients informed and engaged, further strengthening customer relations.
Enhanced Cash Flow Management
With Automa8e, businesses can track receivables in real-time, providing valuable insights into cash flow. The ability to forecast collections and manage invoices in multiple currencies also aids in better financial planning. This visibility allows businesses to make informed decisions regarding their cash flow, reducing the risk of financial strain.
Overall, using Automa8e for email invoicing not only saves time and improves accuracy but also enhances customer relations and cash flow management. By automating the invoicing process, businesses can operate more efficiently and build stronger connections with their clients.
Step-by-Step Guide to Creating and Sending Invoices with Automa8e
Step 1: Create the Invoice
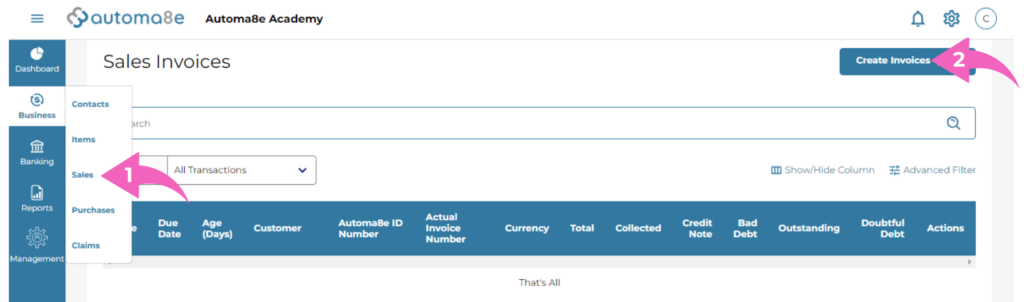
Navigate to the Business Module
- Log in to Automa8e: Open your web browser, go to the Automa8e website, and log in with your credentials.
- Access the Business Tab: On your dashboard, locate the navigation menu.
- Select “Sales”: Click on the “Business” tab and then select “Sales” from the dropdown menu.
Create a New Invoice
- Click on “Create Invoice”: Look for the button labeled “Create Invoice” and click on it to start a new invoice.
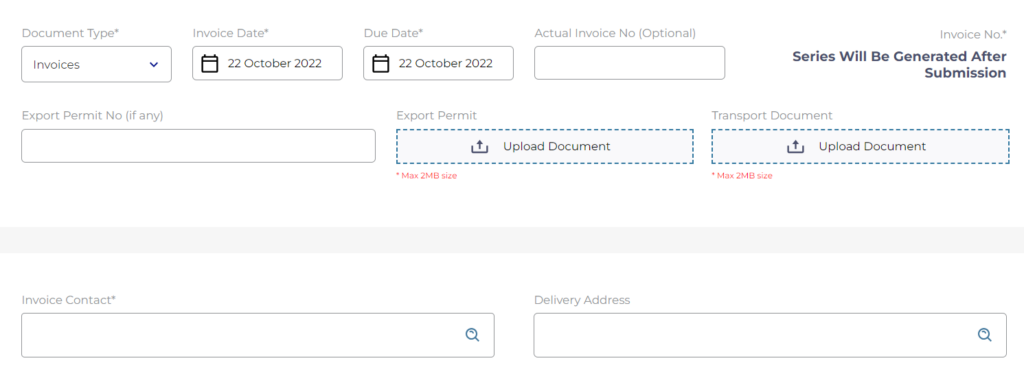
Step 2: Key in Invoice Details
Invoice Contact
- Enter Company Name: In the invoice contact field, input the name of the company you are invoicing. This will be the primary recipient of the invoice.
- Due Date: The due date will automatically populate based on the payment terms defined when the contact was created. Ensure that this date is correct.
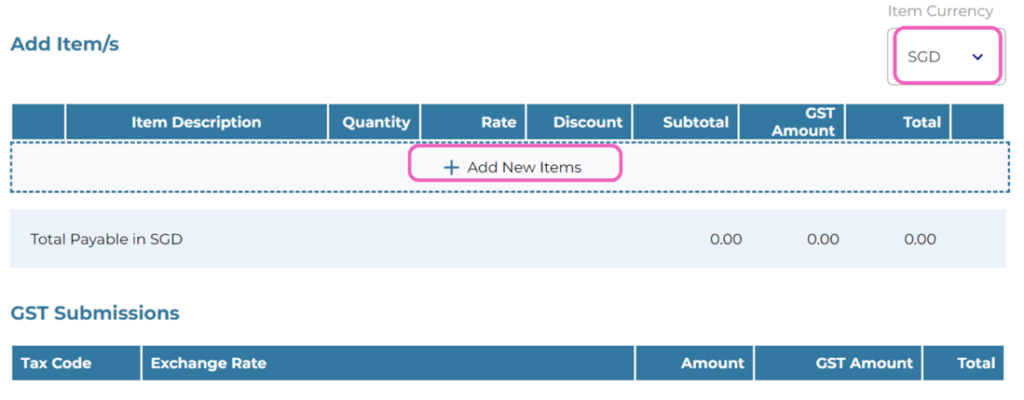
Invoice Items
- Add Items to the Invoice:
- Click on “+ Add New Items”: This button allows you to add products or services to the invoice.
- Select Existing Items: If the item is already in the system, choose it from the drop-down menu.
- Enter New Item Details: If the item is not in the system, type in the necessary details, including the description, quantity, and price.
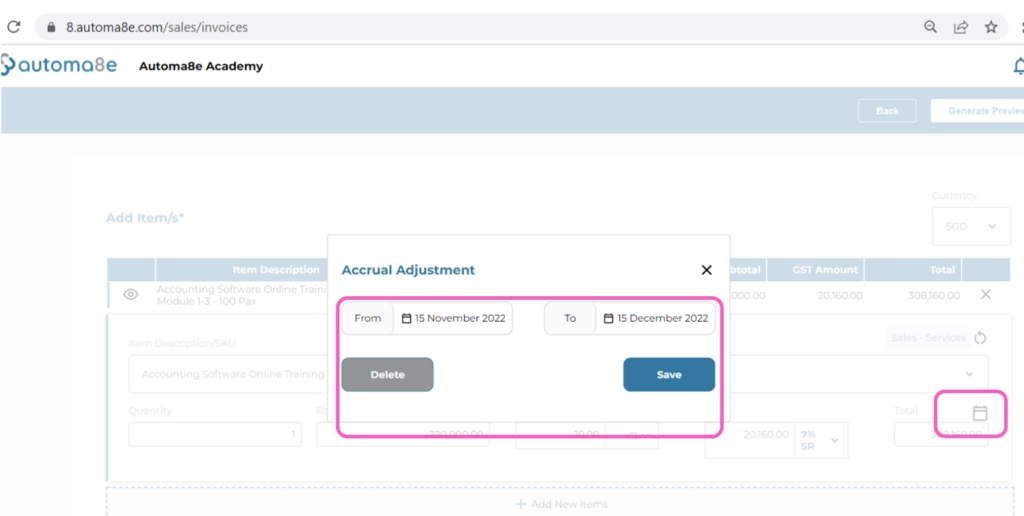
Accrual Adjustments (If Needed)
- Record Accruals:
- Click on the Folder Icon: This icon allows you to access the accrual adjustments section.
- Input Accrual Timeline: Enter the timeline for the services or goods accrual.
- Click “Save”: Ensure that any accrual adjustments are saved.
Step 3: Generate and Review
Generate Preview
- Click on “Generate Preview”: This option will create a preview of the invoice, allowing you to see how it will appear to the client.
Review the Invoice
- Check All Details: Carefully review all information in the preview, including:
- Company name
- Due date
- Item descriptions, quantities, and prices
- Accrual adjustments (if applicable)
- Make Necessary Adjustments: If you notice any errors or need to make changes, go back and edit the relevant sections.
Step 4: Send the Invoice
Send the Invoice
- Preview Window Options: In the preview window, you will have several options:
- Print/Download the Invoice: If you need a physical copy.
- Save as Draft: If you want to save your work and come back to it later.
- Save, and Next: This saves the current invoice and opens a new invoice page for further creation.
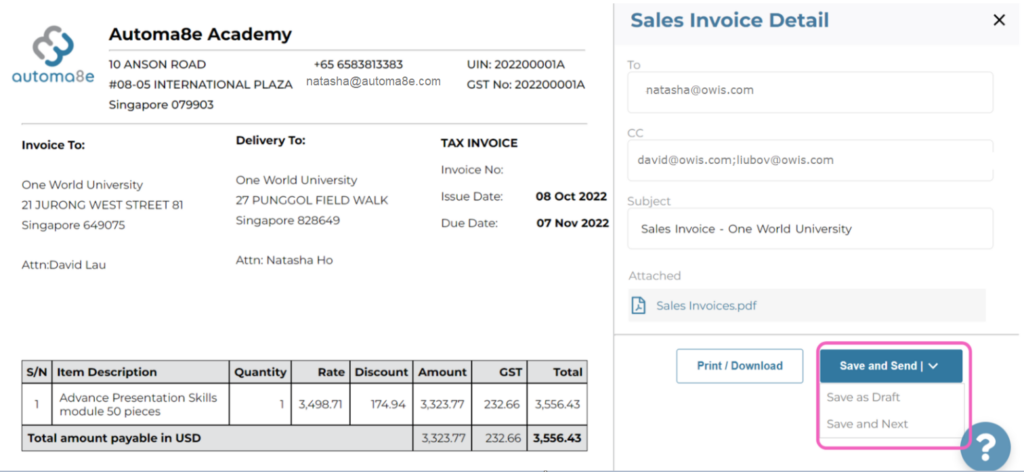
Select “Save and Send the Invoice to the Client”
- Direct Email Delivery: This option will send the invoice directly to the client via email. By selecting this feature, you ensure that your client receives the invoice promptly, streamlining the payment process.
- Automatically Generated Email: Before sending, you can read the email that will be sent to your client. This email is automatically generated by Automa8e, eliminating the need for you to write it manually.
- Customization Options: If you wish to make any adjustments, you can easily customize the email content to add a personal touch or additional information before sending.
- Efficiency and Convenience: After reviewing and customizing the email, you can send the invoice with just one click. This action eliminates the need for manual email drafting and attachment, saving you time and reducing the risk of errors.
- Professional Communication: Sending invoices directly through Automa8e enhances professionalism, as clients receive clear and concise invoices without additional steps.

By utilizing the “Save and Send the Invoice to the Client Via Email” feature, you can enhance your invoicing efficiency and improve client satisfaction through timely communication. This streamlined process ensures that your clients receive accurate invoices along with a personalized email, all in just a few clicks!
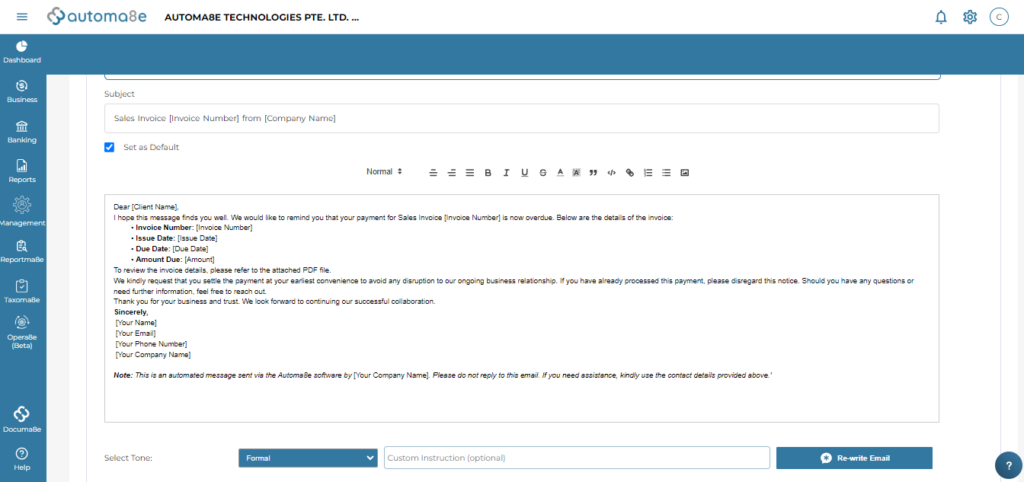
How to create a one-time email template in Automa8e that you can use for future communications:
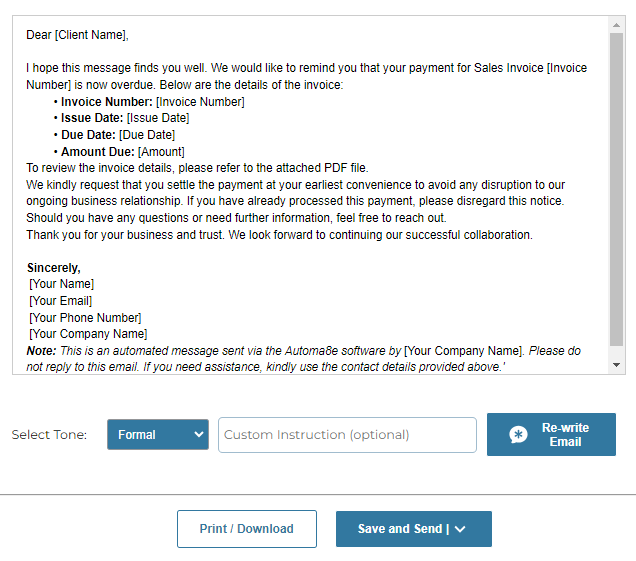
In Automa8e, you have the flexibility to create your own email templates tailored to your specific needs. This feature allows you to design templates that reflect your brand’s voice and style, ensuring consistent communication with your clients. Whether you need a template for sending invoices, follow-up reminders, or general correspondence, you can easily customize the subject line, body text, and other details.
By incorporating dynamic content placeholders, such as customer names and invoice numbers, you can personalize each email without having to rewrite it from scratch. This not only saves you time but also enhances the professionalism of your communications, making it easier to maintain strong relationships with your clients. With Automa8e, you can streamline your email processes and ensure that every message you send is tailored to your unique business needs.
Step-by-Step Guide to Setting Up Email Templates in Automa8e
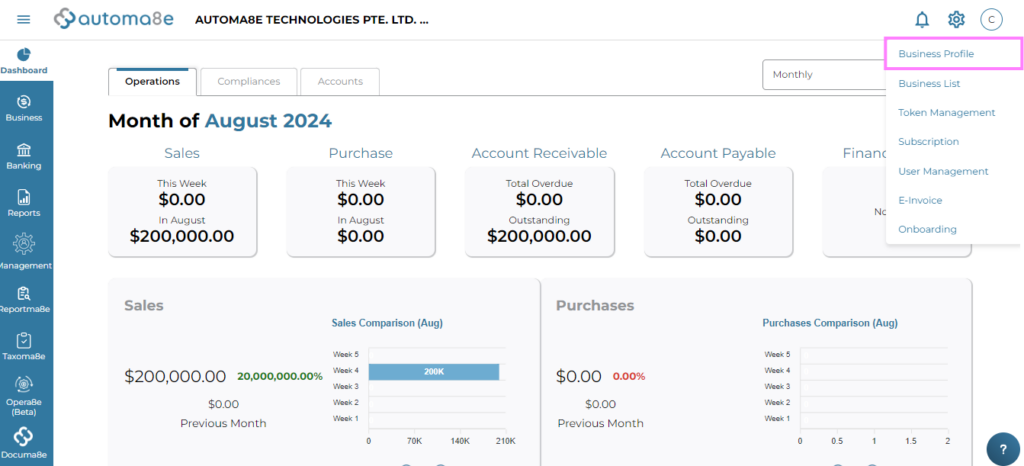
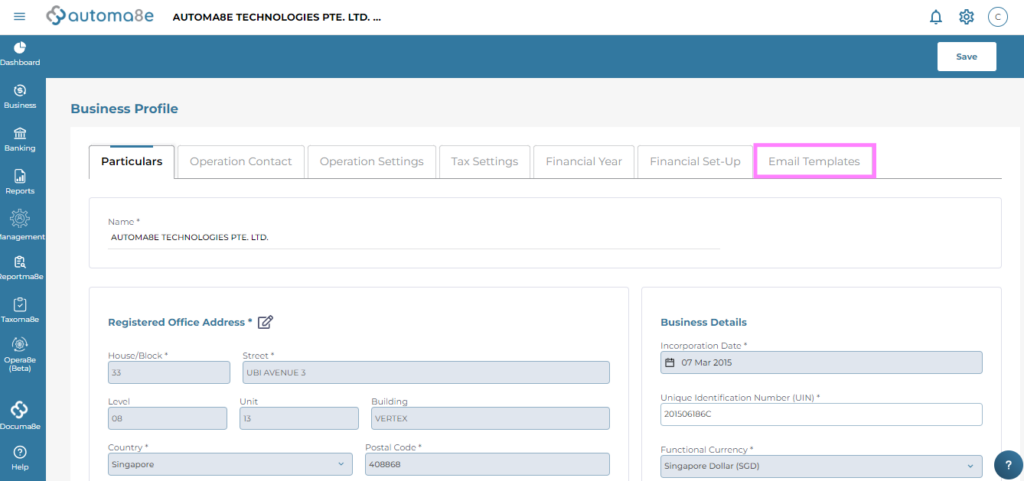
Navigate to Business Profile
- Log in to Automa8e: Open your web browser, go to the Automa8e website, and log in with your credentials.
- Access Settings: Click on the settings icon located in the top right corner of the page.
- Select “Business Profile”: From the drop-down menu, choose “Business Profile” to enter the profile settings.
Email Template Setup
- Locate the Email Template Tab: In the Business Profile section, look for the “Email Template” tab.
- Click on the “Email Template” Tab: This will take you to the area where you can create or edit email templates for various communications.
Create/Edit Email Template
- Add a New Template:
- Click on “Add Template”: If you want to create a new email template, click this button.
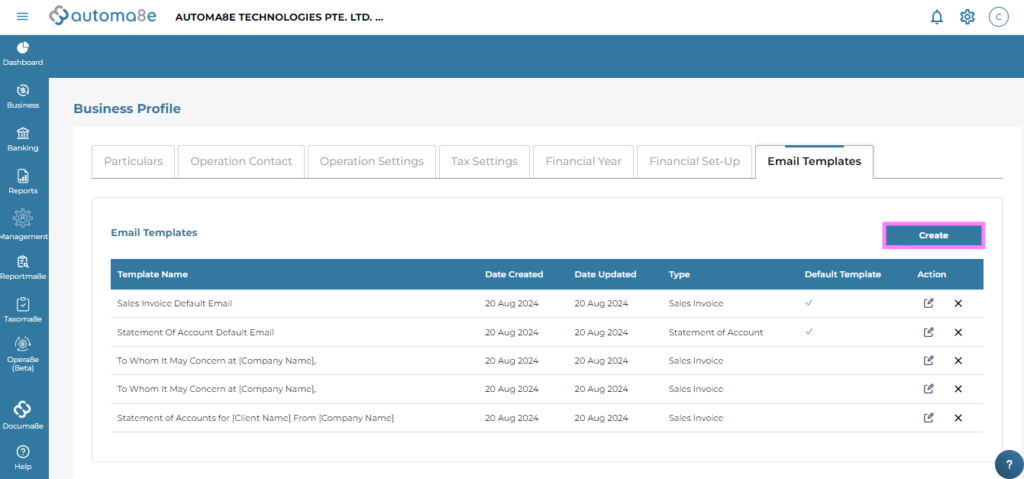
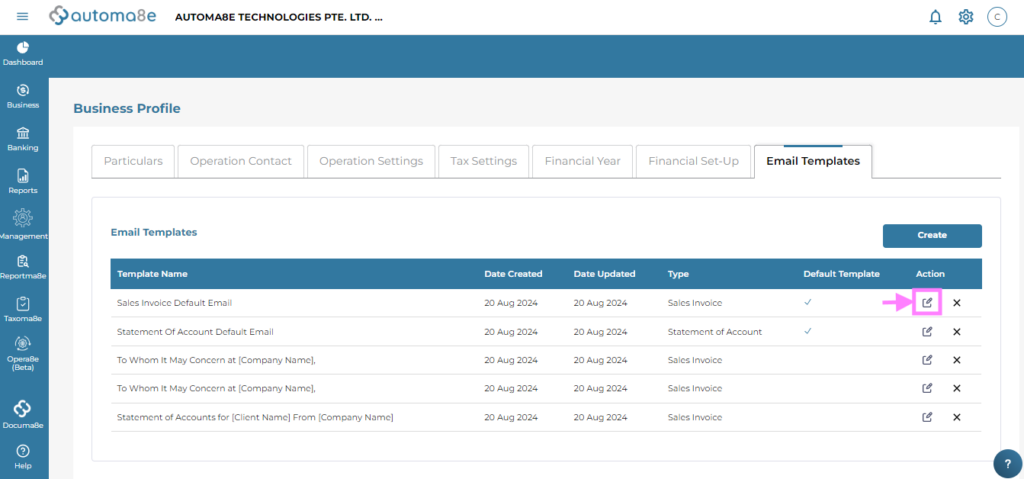
- Edit an Existing Template:
- Select from the List: If you wish to modify an existing template, choose it from the list of available templates.
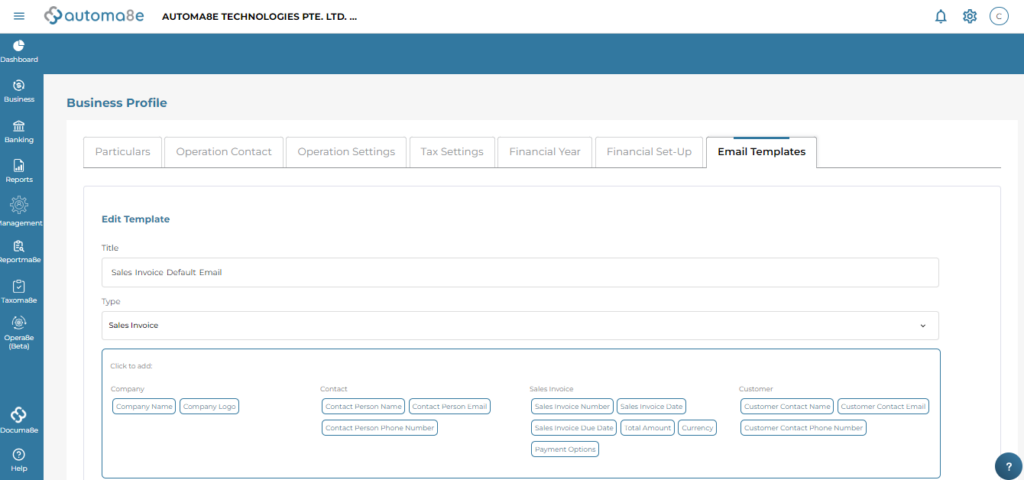
- Customize Your Template:
- Subject Line: Enter a relevant subject line that reflects the content of the email.
- Body Text: Write the main content of the email. You can include specific details about the invoice or services provided.
- Dynamic Content Placeholders: Use placeholders for dynamic content, such as customer names, invoice numbers, and due dates. This allows for personalized communication without needing to rewrite the email each time.
- Click “Save”: After customizing the template to your satisfaction, click the “Save” button to store the template for future use.
By setting up email templates in Automa8e, you can streamline your communication process. Creating one-time email templates tailored to your needs allows you to save time and maintain consistency in your messaging. Whenever you need to send an invoice or other email communications, simply select your pre-made template, make any necessary adjustments, and send it out with ease! This feature not only enhances efficiency but also ensures that your communications are professional and personalized.
In Short
In today’s fast-paced business landscape, mastering the art of invoicing and client communication is more crucial than ever. Automa8e empowers you to streamline these processes, allowing you to create, send, and manage invoices effortlessly. By automating your invoicing tasks, you not only save precious time but also minimize errors and enhance your cash flow management.
Imagine the relief of sending invoices with just one click, knowing that your clients receive them promptly and professionally. With the option to customize automatically generated emails, you can add a personal touch that fosters stronger client relationships. Furthermore, the ability to create tailored email templates means you can maintain your brand’s voice consistently across all communications.
So, why wait? Take advantage of Automa8e’s powerful features today and transform the way you handle invoicing and client interactions. Start by exploring the email templates and automation tools available to you—your future self will thank you for it! As you embark on this journey toward greater efficiency, consider this: How much more could you achieve if you spent less time on administrative tasks and more time focusing on what truly matters—growing your business and nurturing client relationships? Embrace the power of automation with Automa8e and watch your business thrive!